Google presentations are great for a lot of reasons. Unfortunately, they are designed to go from one slide to the next in a simple, linear fashion. There’s a way to make them interactive. This post tells you how to do just that.
Short instructions:
1) Create a presentation.
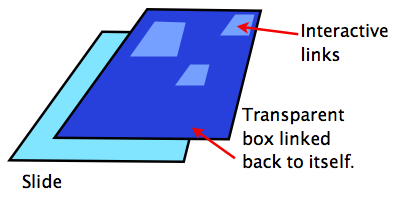
2) Completely cover each slide with a transparent box.
3) Link that box to the same slide on which it was placed.
4) Add small transparent boxes over the portions that will make your "buttons" interactive.
Long instructions:
Create your slides
First create the entire tutorial minus the interaction. This includes any interactive buttons or clickable objects. Also, make sure you add any animations or slide transitions before moving on to step two. I'll explain why latter. I suggest making the tutorial in something like Powerpoint first, then copying it over to Google Docs. Powerpoint is far easier to work with. You’ll be better able to concentrate on architecture of the tutorial and be able to troubleshoot with less hassle. Google Docs will convert Powerpoints into a Google presentation, so there really isn’t much more work creating the tutorial in a separate program.
Once the tutorial has been created, uploaded and converted, it’s time to add the magic. First, we have to remove a feature that Google built into presentations. Normally, when you click on a slide it will automatically move to the next slide. You can stop that from happening by covering the entire slide with a transparent box.
Cover each slide
Add the box by clicking on “Insert”, then “Shapes”, then choose the square. You'll get a pair of cross hairs that you can use to draw whatever size square you choose. Start drawing just outside the slide, then click and drag to create a shape large enough to extend beyond the borders of the slide. Next, change the fill to transparent. Leave the line. This makes the box easy to for you see and since the box is outside the boundries of the actual slide, no one else will notice them. Now, click on that box, then click on the link button. One of your options will be to link to a specific slide. Choose the slide you are currently on. That way, when someone clicks anywhere on the slide, they'll stay on that slide and won't be able to move forward. You'll be giving them a way to move around in a moment. For now, you just need to prevent them from pushing forward every time they click on a slide.
Add invisible, linked squares
Finally,you’ll need to add the interactivity. Remember that you've already created the tutorial. All you're doing at this point is making your buttons and other clickable objects work. Once again, you'll need to create a transparent box and link it to a slide. This time, however you'll be linking to a slide
further along in your presentation.
In my example presentation, you'll see a "Next" button. I've covered that button with a transparent box that is hyperlinked to the next slide. When someone tries to click "Next", they'll actually click on my transparent box and be sent to the next slide in the tutorial.
Copy and paste is your friend here. For buttons like Next, Previous, Home and Exit, the transparent boxes will all be the same size and placed in same area on each slide. Once you have the boxes created for one slide, select all of the blocks (ctrl + click) then copy them all. Now all you have to do is go down from slide to slide hitting ctrl +v, pasting those boxes into position.
Publish or share
Don't forget that when you're all done, you need to change the privacy settings in your presentation to allow others to see what you've wrought. Below, I have an example of an very short interactive tutorial. It will give you an idea of what you can create.


