Showing posts with label Docs. Show all posts

5/05/2013

Interactive tutorials with Google

Google presentations are great for a lot of reasons. Unfortunately, they are designed to go from one slide to the next in a simple, linear fashion. There’s a way to make them interactive. This post tells you how to do just that.


Short instructions:
1) Create a presentation.
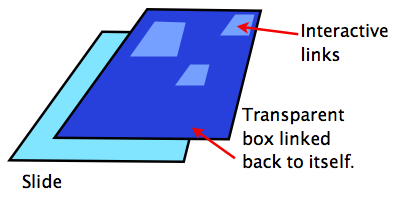
2) Completely cover each slide with a transparent box.
3) Link that box to the same slide on which it was placed.
4) Add small transparent boxes over the portions that will make your "buttons" interactive.


Long instructions:


Create your slides
First create the entire tutorial minus the interaction. This includes any interactive buttons or clickable objects. Also, make sure you add any animations or slide transitions before moving on to step two. I'll explain why latter. I suggest making the tutorial in something like Powerpoint first, then copying it over to Google Docs. Powerpoint is far easier to work with. You’ll be better able to concentrate on architecture of the tutorial and be able to troubleshoot with less hassle. Google Docs will convert Powerpoints into a Google presentation, so there really isn’t much more work creating the tutorial in a separate program.


Once the tutorial has been created, uploaded and converted, it’s time to add the magic. First, we have to remove a feature that Google built into presentations. Normally, when you click on a slide it will automatically move to the next slide. You can stop that from happening by covering the entire slide with a transparent box.

Cover each slide
Add the box by clicking on “Insert”, then “Shapes”, then choose the square. You'll get a pair of cross hairs that you can use to draw whatever size square you choose. Start drawing just outside the slide, then click and drag to create a shape large enough to extend beyond the borders of the slide. Next, change the fill to transparent. Leave the line. This makes the box easy to for you see and since the box is outside the boundries of the actual slide, no one else will notice them. Now, click on that box, then click on the link button. One of your options will be to link to a specific slide. Choose the slide you are currently on. That way, when someone clicks anywhere on the slide, they'll stay on that slide and won't be able to move forward. You'll be giving them a way to move around in a moment. For now, you just need to prevent them from pushing forward every time they click on a slide.

Add invisible, linked squares
Finally,you’ll need to add the interactivity. Remember that you've already created the tutorial. All you're doing at this point is making your buttons and other clickable objects work. Once again, you'll need to create a transparent box and link it to a slide. This time, however you'll be linking to a slide
further along in your presentation.

In my example presentation, you'll see a "Next" button. I've covered that button with a transparent box that is hyperlinked to the next slide. When someone tries to click "Next", they'll actually click on my transparent box and be sent to the next slide in the tutorial.

Copy and paste is your friend here. For buttons like Next, Previous, Home and Exit, the transparent boxes will all be the same size and placed in same area on each slide. Once you have the boxes created for one slide, select all of the blocks (ctrl + click) then copy them all. Now all you have to do is go down from slide to slide hitting ctrl +v, pasting those boxes into position.

Publish or share
Don't forget that when you're all done, you need to change the privacy settings in your presentation to allow others to see what you've wrought. Below, I have an example of an very short interactive tutorial. It will give you an idea of what you can create.




1/09/2013

Blogger plus Drive = Awesome


One of the great things about Google is that it uses largely the same platform for all of it’s services (Drive, Sites and Blogger). That means that you can use one service to create your content and publish it using the other service. I’ve mentioned this before here, but I thought it was worth mentioning again.
This post was not written in Blogger, but in Google Drive where I compose all of my posts. When I’m finished, all I need to do is copy and paste everything into Blogger and hit publish. The big advantage here are the editing tools that Google provides for you in Drive that are missing in Blogger. Specifically, I can add tables, move text around easily, change line spacing and format my document in ways that I wouldn’t otherwise be able to do. Google drive also makes working with images a breeze.
If you’ve been using Blogger for a while and would really like to have more functionality, try creating your work in Google Drive and just using Blogger as a publisher. I think you’ll be really pleased.

7/26/2012

Edit Docs Offline

Originally Posted by Google: 24 Jul 2012 07:56 PM PDT
Scheduled Google Docs Update for July 31st


By the beginning of the school year, you'll be able to edit your Google docs without an internet connection. All you'll need is the latest version of Chrome and the Google Drive app from the Chrome store.


Another nice feature is the ability to preserve previous versions of documents. As you may or may not know, Google deletes any revisions older than 30 days or when there are more than 100 previous versions of the same document. By August, you'll be able to indicate that you want certain versions saved. This could be useful when curriculum mapping.

2/05/2012

Digital Common Formative assessments

Teachers around the U.S. are struggling with just how to create common formative assessments. Of course, it's a lot more complicated than just coming up with a little quiz or thinking up an exit ticket at the end of class. A lot of the work deals with meetings within our department. We get together to discuss the scope and sequence of what we teach. Then we have to generate the actual assessment.

Once the assessment is deployed, of course it has to be analysed. We once again have to get together with our department to figure out how our students are doing compared to the students of Mr. Smith down the hall, for example. If my students didn't do as well, I need to figure out what Mr. Smith does better so that my students learn more.

Typically this kind of work leads to improved education. Its extremely valuable. You've got to admit, though- this is a whole lot of work.

Technology can make common formative assessment far easier and often more productive. Let's start by looking at the creation. To make any assessment common requires collaboration on a single file and there are some great online tools to make that happen.


Google docs: This tool provides teachers a way to work on the same document at the same time online. When a group works together on a single document, everyone can see what everyone else is typing, teachers can ask questions of each other or make comments in a side bar as the assessment is being created. On the other hand, if everyone just wants to work on the document when they have time, that's fine as well. 

Edmodo: This is a safe, secure social network for teachers and students. Individuals in a  department can post questions as status updates. Other teachers can then make comments on those questions or suggest modifications. These conversations would be restricted to the department. No one else in the world would be allowed to see these interactions without explicit permission.

Skydrive: For those of you who work in an exclusively Microsoft world, this is your best bet. Much like Google, Skydrive is a way of working on Word, Excel and Powerpoint projects collaboratively.  Your team may want Skydrive instead because formating does not carry over well. While Google docs is probably the best and most reliable cloud storage to date, converting documents to their format can be a real pain.

Now that you've all decided on the nature of the assessment, its time to present it to the students. There are several digital tools that can help you with that.

Clicker technology (eInstruction and Promethean)- This is probably one of the fastest and most useful tools available for conducting formative assessments. There are a two main reasons. First, students usually enjoy it. You don't have to worry about them just putting in an answer because the reward for getting the right answer is "winning". Students who are all voting simultaneously get to be part of the group that got it right whereas those who do self paced tests get to win at what is in many ways a video game. Second, the data is stored immediately and can be analysed in useful ways.

Online quizzes: (Edmodo, Openclass, others)- There are numerous free sites which allow teachers to create sophisticated quizzes for students to take online. The advantage here is that students can use any internet ready device. The big disadvantage is that these devices are often more difficult to come by (you have to check out the laptops or the iPods for example).

Soapbox: This is a great site for gaging the engagement of a class or giving quick quizes. Since there is no way to tie results to any one student, however, it serves as more of a "quick and dirty" digital assessment of a whole class. Soapbox works best if the students are already using laptops for your lesson.

When the data is collected, it's time to get the department together again to go over results. Instead of forcing everyone to gather in the same place at the same time, you could go back to the collaboration tools I mentioned above. These tools make it easy for teachers to add comments next to each question in the assessment noting the percentage of students who got the question right. They could also mention useful strategies for teaching that concept.

If you still want some face to face interaction but your having a hard time getting everyone together in the same place, consider Google Plus. This social network allows you to hold video conferences at the same time you work on a Google doc. So you can see and speak to one another while writing on the same document.

Common formative assessments hold so much power to improve learning. The digital tools I've mentioned here can make the creation, deployment and analysis of those assessments far easier than ever before.


1/12/2012

Tech provides more usable time.

One of the reasons teachers use technology is that it saves time and effort. Of course many tools are designed to reduce the time and effort it takes for instructors to produce material. Examples of this include test generators and word processors. Today, though, I want to focus on our students during class time. Unfortunately, students can be left to stare into space as we take time to draw something out on the over head or sketch an equation on the whiteboard.

One of the greatest tools I have found for math teachers is the Desmos online calculator. The power of this application lies in the fact that a teacher can manipulate equations and the students can instantly see how the graph of that equation changes in response. A teacher told me recently how excited he is that he no longer has to sketch graphs out by hand while teaching. "And you know that half the kids start day dreaming when we do that", he added. With Desmos, he can use his time to explain concepts and cut down on the wandering minds.

There are also several interactive science sites that are very good. The Dynamic Periodic Table is excellent, for example. During a lesson, you need only hover over sections of the table to bring up important information. It's great for answering student questions or covering material clearly and quickly. Biology teachers love the Cells Alive online cellular models for the same reason.

For language arts, Google docs is a great time saver. This online suite of programs allows users to create presentations, documents and spreadsheets for free. It also allows users to collaborate on any of those files in real time.  The reason this cuts down on dead air is that no one has to wait around for group members to read over material and make comments. Everything in the document is written simultaneously, so everyone in the group can read everything while it is being typed. You as an instructor can also comment on student writing in real time. This means that an entire class can be writing while you make encouraging comments on each paper. All of this is done simultaneously and all without interrupting anyone's train of thought.

Class time should really be used for learning, not waiting for us to draw or read over material. The technology I've discussed is a great start, but there's so much more. What sorts of tools have you found to get more learning out of the limited time you have in class?

1/03/2012

Effects on student writing

Student writing is taking an interesting turn, don't you think? There are currently far more forms of writing than ever before. It ranges from traditional hand writing to the recent social media phenomenon. These writing mediums are all influencing one another in subtle and not so subtle ways. Lets take a quick look at some of what's going on. Contrary to popular opinion, there is plenty of handwriting going on. For example, it's still taught in primary schools whereas students don't learn to type till much latter. Plus, nearly everyone handwrites their class notes largely because there aren't many alternatives to pen and paper (especially in math class!).

On the other hand, do kids even pass notes in the hallway anymore? I think they only text each other to keep up with the local gossip. Once they get home from school, they start working on homework... right after updating Facebook  and Tweeting a little. They let their friends know how they're doing in 140 characters or less. Texting and posting on social media is an amazing feat of of encapsulation. They take dozens of feelings and events and boil them down to just a few sentences! Imagine how great it would be if students would apply that ability to summarize our last lecture.

Of course, word processors are ubiquitous in education. Whether using Microsoft Word or Google Docs, students nearly always type essays or research papers. And it makes sense. Their teachers really don't want to deal with paper fringes or sloppy penmanship. Plus, there are no spell checkers in a pencil. What student would ever want to turn in a paper without a computer to proof read it for them.

So what are all of these writing forms doing to a student's ability to put thoughts down on a page? One clear effect is on spelling. In the past few years I've seen students inserting "cuz" instead of "because", "pple" instead of people or even "l8r" instead of "later". These text abbreviations are even put into graded essays. The other thing that I've noticed is a decline in complex sentences. Most of my students write in small, easy to read sentences. Since these are the same kids that send short blurbs to others everyday while texting, its little wonder that sentences should shrink. Word processors have actually improved student writing, though. Or at least they can. A word processor can allow students to easily brainstorm, manipulate text and edit on the fly. If they are using an online editor like Google Docs, students can also collaborate on writing and teach each other in real time.

So it's clear that student writing is going to continue to evolve. It also seems clear that much of that change will be driven by the multitude of writing media available today.

1/02/2012

On Tradition

We do what we have always done because it works. And hey, why reinvent the wheel? Besides, we have so many things we have to get done that it's hard to find time to learn a new way of doing things. The thing is, it turns out that our ways are often inefficient or less productive than some alternatives.

With a new semester upon us, it may be time to try a few new tools. Below, I list some of my favorite online tools to improve teaching in the next 18 weeks. Give them a try. You may find yourself getting more done in less time, for free.

Google docs + Google calendars
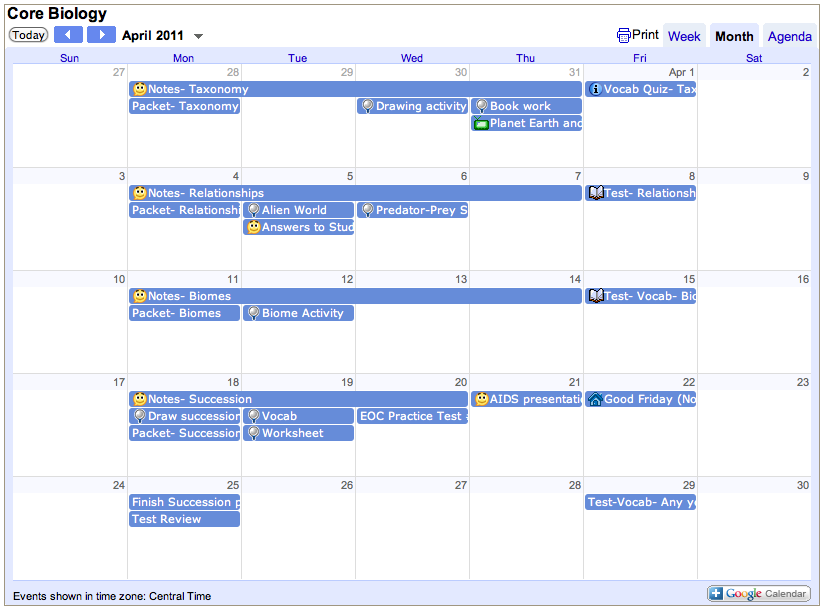
I've written about this mash-up before. Google calendars is an easy to use schedule that you can work on at any time and on any computer that's handy. Calendars also has a nice feature that allows you to attach any file to an event as long as it is already in your Google docs account. That opens up the possibility of attaching lesson plans, tests and student samples. Since you can make any of those files private, you never have to worry about anyone else in the world seeing sensitive documents.

Edmodo
Students love social media for good reasons; it's fun, engaging and it makes learning easier. Unfortunately, there are so many dangers and pitfalls to using sites like Facebook or Twitter. The solution is a site designed specifically for educators to communicate with their students. Parents have full access to their own student's activities and teachers moderate all discussions. There is no outside communication and students don't have the option to talk to the outside world. Better yet, you can make self-grading quizzes and polls for free!


Desmos Graphing Calculator
Students are given all sorts of wonderful technology in schools. They are still being asked to buy expensive calculators. Finally here is a free online solution. Help kids learn to do math without expecting them to buy equipment.

Prezi
Perspective matters. Much of what we talk about in class deals with large scale vs. small scale. Consider these questions: What does a water molecule have to do with whether you have a desert or grassland? How did the Delaware river affect George Washington? What does the hight of a tree and the length of it's shadow have to do with a protractor you hold in your hand?
Prezi is an online presentation site that creates unique, beautiful presentations. Kids love them!

Educational Youtube
Finally! A way to get good educational videos at school! You don't have to worry about crude jokes or wardrobe malfunctions. Its all good stuff here. Well, that's mostly true. Unfortunately, suggestive videos are still sometimes suggested on the right hand side of the screen. You can't watch them, but the suggestive picture is there along with the provocative title. You'll just need to be a bit careful even when the video you want to watch is great.


10/03/2011

Cirriculum mapping

Curriculum mapping is a powerful tool. It is a process of recording everything that is taught and assessed in order to improve instruction in a department. This can take some time, since each person in a given department has his or her own way structuring a class. In biology, for example, one teacher may want to start with chemistry and another prefers evolution. To add to this, there are different ways of scaffolding information and assessing what has been learned.

Google products can make this process more manageable.

In Google docs, all of your assessments from worksheets to tests can be stored and shared securely. By putting these documents online, other teachers can have access to your materials. Students can easily be blocked from seeing them however, making the system both secure and collaborative.

Google calendars increases selective collaboration even more. Here, you can enter the topic you are covering, the standard, performance indicator or essential question the topic covers. You can also attach any document you have in your Google docs account. Here's the really magical part of all this- it is secure!

If you only share your test with faculty members, then students cannot see it. However, any other teachers can take a look at what you're testing and adjust their teaching accordingly.

At the end of the year, when it comes time to map the curriculum, simply search for the standard, performance indicator or essential question. Every date in which the indicator was typed will show up instantly. Click on the date and the details of the entry appear. If you've attached a test or assignment stored in Google docs, you can share the material.

Using this method would not only benefit the department, but individual teachers. They would never have to wonder what they did last October. If they want to know how long they taught osmosis last year,  they just look it up. Which handout went along with that lesson on rain forests? It's attached to the lesson.

Google docs combined with Google calendars is a powerful way to improve education.